

HOW TO: Build Your Own Custom Computer Desk!
💪 DIFFICULTY RATING: 40%
⏱ TIME: A Weekend!
Whether it’s for working from home, studying or gaming, a good office & computer desk never fails to be a great addition to your furniture collection, helping to create a dedicated, functional area for you and your family to enjoy - whatever you use it for!
Creating your own computer desk isn’t hugely difficult, and with the right tools and materials, even relatively inexperienced DIY’ers should be able to start and finish this project in just a single weekend.
In this guide, we’ll take you through the steps needed to create a practical and personal parson-style office/computer desk, complete with drawers, which are perfect for keeping laptops safe, chargers and cables organised or filing away those important documents you’re always misplacing!
What you’ll need…
WOOD for the top, either 6 x 2 or 8 x 2 boards work well.
4 x table LEGS.
TIP: ensure the legs you purchase should be at least 24” or 610mm tall.
(Available at Eurofit Direct)
4 x 1 TIMBER for the drawer.
One sheet of PLYWOOD.
2 x DRAWER SLIDES.
(Available at Eurofit Direct)
DRAWER HANDLES
(Available at Eurofit Direct)
CABLE HOLE TIDY
(Available at Eurofit Direct)
BISCUIT JOINER
NO. 20 BISCUITS
WOOD GLUE
WOOD FILLER
DUST MASK
DRILL & DRILL BITS
(Drill Bits Available at Eurofit Direct)
CIRCULAR SAW
TAPE MEASURE
(Available at Eurofit Direct)
SCREWDRIVER
PENCIL
SCREWS
(Available at Eurofit Direct)
FRAMING SQUARE
PLANER
SANDER / SANDPAPER
FINISHING NAILS
(Available at Eurofit Direct)
HAMMER
(Available at Eurofit Direct)
Step 1: Sourcing Your Materials
First off, you’re going to want to choose the material for your desk, and this all comes down to your budget and personal preference.
Whilst a board of MDF will serve perfectly well as a top, you might want to source something that matches your interior style. You should be able to get a range of different timber boards from any DIY store, and you’ll be able to pick up any stain or finish you want to complete the look.
Another option is to source reclaimed wood, which you may be able to pick up from your local salvage/reclamation yard.
TIP: You must dry this out properly before starting the building process.
When it comes to the legs, you’ve got a few options. At Eurofit, we supply a wide range of quality, easy-to-fit table legs, but you may also be able to source antique cast iron legs or industrial bases from your local antique shop or online.
TIP: Whatever you decide on, be sure to go for something at least 24” tall!
Step 2: Preparing the Top
If you’re using reclaimed wood, you’ll need to remove any nails, before using a planer and sander to ensure you have an even and smooth surface.
Once you’re happy with the surface of your boards, rough-cut four of them to the desired length.
TIP: Leave a couple of inches extra in the length, as you’ll be making the final cut after you’ve joined the boards together.
Step 3: Creating the Top
Next, it’s time to put your timber boards together to create the top, using your biscuit joiner. Lay your 4 planks across a flat surface, and put them in their final position next to each other. Now, using a pencil, make marks along the seams where the boards will fit together at 8” intervals.
Cut slots at these intervals, then coat your biscuits with glue, before inserting them into the planks, and assemble the planks together. Clamp the planks together, and tighten until the gaps disappear, before waiting for the glue to dry.
TIP: Be careful not to over-tighten the clamps.
Once the top is dry, remove the clamps, then remove any glue splurges using a planer, sharp knife, or a razor blade.
Step 4 (Optional): Fitting the Cable Tidy
With the top completed, you now have the option to add a cable a tidy if you’ll be using several electrical items on your all-new desk. This is definitely a worthwhile and inexpensive addition to make, protecting against any potential trip hazards that loose wiring can cause.
These are straightforward to fit – just mark and cut a hole of the right size using a circular drill cutter, router or jigsaw, then sand the edges, ready to pop in your cable tidy at the end of the process.
Step 5: Fitting the Legs
Back to the essentials. If you’ve purchased standard Eurofit legs, then these come with a simple fixing plate that screws into the underside of your worktop. To fit the legs, simply measure where you’d like them to be, mark the fixing holes with a pencil and drill some pilot holes. Following these steps, you’ll be able to fix the legs to the table top.
Step 6: Finishing the Top
Once you’ve fitted the legs, you can finish the desktop by creating some edge banding to cover the cut ends of the boards. To do this, take some of your leftover boards, and cut them to length, before gluing and nailing them to the edges. Finally, sand down the whole of the top, before adding your preferred primer/paint, wax or stains to the wood.
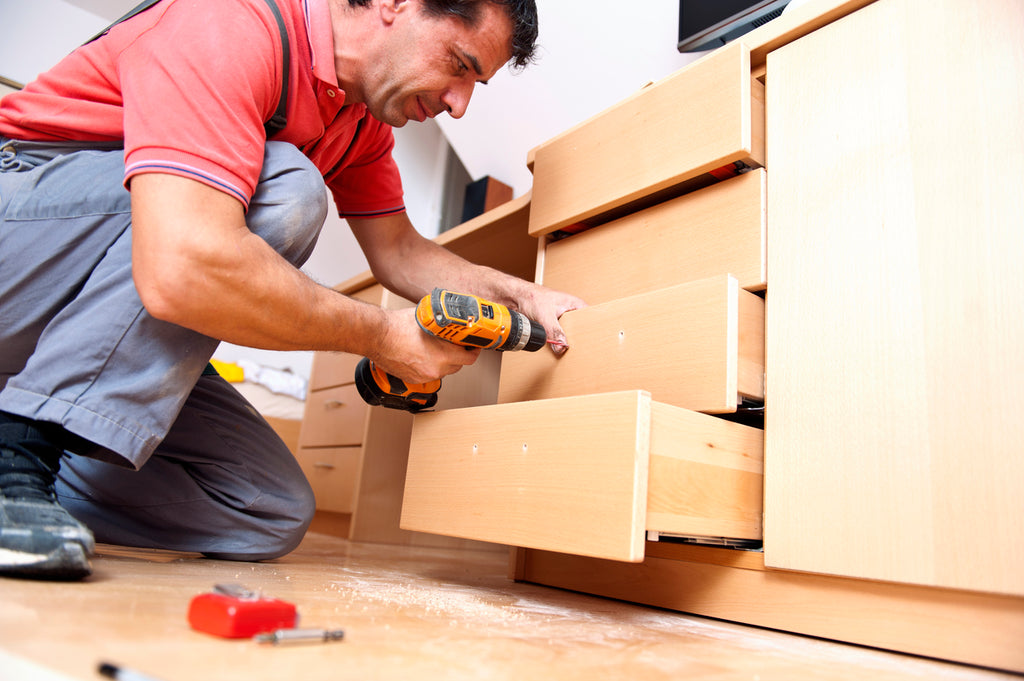
Step 7 (optional): Adding a Desk Drawer
Regardless of what you plan to use the desk for, adding drawers is always a smart move. Follow the steps below to create yours:
First off, you’ll be making the box. Take the 1x4 timber, and cut it to the following lengths:
TIP: you’ll need a 16ft length in total to make a 2ft x 1ft drawer.
Two pieces at 22.5” (for the front and back)
Two pieces at 12” (for the sides)
One piece at 28” (for the front panel)
Then, cut a base out of ½” plywood for the box to 22.5” x 10.5”.
Attach the sides, front and back pieces to the base using your wood glue and some finishing nails, before attaching the front panel with an equal amount of overhang on each side.
Next, attach your drawer slides to each side of your box before getting to work on the drawer support:
1. First, measure the full width of your box (including the drawer slides) and cut a piece of 4×1 timber to that length, before cutting two further pieces 14” in length.
2. Now, turn your table over, and find the centre point, before fixing the drawer support lengths to the table, with the 14” pieces as the sides and the custom length piece as the back. Position them 1” back from the front of the desk, so that the drawer sits flush to your desk.
3. Finally, attach the drawer slides to the inside of the support, and the desk is complete!
Many of the tools, materials and components needed for the desk are available at Eurofit Direct, and if you need any help or guidance with either buying what you’ll need or with putting together the final project, please don’t hesitate to give us a call or drop us an email.
